
Contributor post by Chelsea of Lovely Indeed

Happy holidays, pals! Hope you're having fun decking halls and all that jazz. I'm in wrapping mode, and I really wanted to put the ol' DIY treatment on my giftwrap this year. If you want to do the same and create some awesome, hand-stamped paper, grab your materials. You'll need:


Happy holidays, pals! Hope you're having fun decking halls and all that jazz. I'm in wrapping mode, and I really wanted to put the ol' DIY treatment on my giftwrap this year. If you want to do the same and create some awesome, hand-stamped paper, grab your materials. You'll need:
- roll of kraft paper
- a stamp block for carving (I used this one)
- printer and ink
- iron
- carving tools and scissors
- wood block
- strong glue
- stamp pad
First, decide on a design for your stamp. If you love the
stag silhouette that I made, you can download it here. Print out your
design and put it face down on the stamp block. Iron it with a low heat
for a few seconds. Peel away the paper and the design should remain on
your block.
Begin
carefully carving away at the design. Go slowly and be careful not to
slice off any edges that you want to keep. Also, be careful not to slice
too far down into the block and cut through.
Once your image is carved, trim the excess around the edges with scissors. Glue the stamp onto the wood block.
Now
that you've got your hand-carved stamp, stamp away! I used a white
pigment ink, which I love against the craft paper. Silver, gold, or
black would also look really cool. If you're creating a pattern with
your stamp, be sure to measure the distance between each image. I put my
stags 5 inches apart and it worked pretty well.
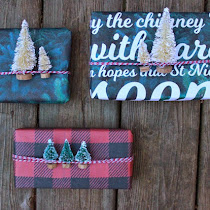
Once
your paper is stamped, wrap your gifts and deck them out! I'm so
excited to give these gifts this year -- so much thought and care went
into the inside and the outside. Happy giving, and happy holidays! xoxo


17 comments:
So cute! Love this and will definitely be giving it a shot :) ~Lily
Niiiiice :)
Love it Chelsea - you've inspired me!
What a great blog post!
looks great!
Looks pretty!
wow... great tutorial!!
so cute, thanks for sharing!
^__^
I love this! No one would have the same paper!
http://dearpoet.wordpress.com/
Love this! No one would have the same paper as you!
I like it a lot. Simple and fun to do
I'm going to give this a try! Thanks for the inspiration.
Very pretty! Love it!
love these!
such a good idea, it inspired me to stamp my wrapping paper this year, although i bought a stamp id didnt make one, photos here
http://abimakes.blogspot.co.uk/2012/12/stamped-wrapping-paper.html
The link to the stag outline is broken. Any way I can find it somewhere?
Such fun paper! I was also trying to link to the stag - but it wasn't working. Any idea where we can find it? Thanks!
Hello! I wanted to let you know that I've featured your project in my holiday DIY roundup! You can find the post here: http://spikesandstardust.com/2013/12/09/what-are-you-crafting-this-holiday-season/. I hope you have a wonderful day!
Post a Comment