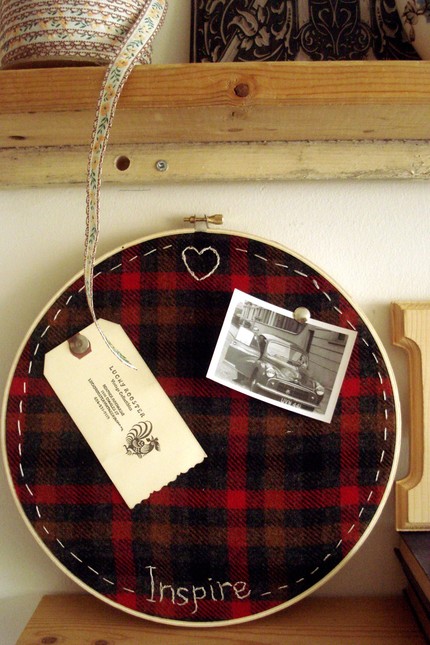
 Inspiration Hoop from Bliss in a TeacupWe asked Becka from Bliss in a Teacup to give our readers a few tips on how they take their most excellent photo's for their online shop. She was kind enough to write a post to share here first on the technical side of things and will follow up with styling ideas in the upcoming weeks. Psssst! Bliss in a Teacup's style shots (like above) are the exact type of product photo's I LOVE for the blog. They are current, interesting (there's a cosy feel to them) and she's got good lighting and focus! A definite one to look at to help with ideas. Visit their Etsy shop to see more. Thanks Becka!
 custom state/province outline via treefox
Hello!
Becka here from
Bliss in a Teacup. I must admit that product photography was one of my most daunting tasks when Richard and I first set up shop. As folks can't pick up, touch or try on your lovely items, the photos you take are hugely important in persuading them to buy from you. In fact, great photography isn't only useful for selling your crafty goods, but for creating that amazing blog post or putting together an awesome promo card for you or your business. The good news is, great product photography really isn't too tricky and you most definitely don't need a fancy camera (although we can all dream!) to do so! Of course there is no one correct way to take photos of your wares, but here are some tips to keep in mind, and I will go more into the product styling in my next post.
1. Natural lighting, natural lighting, natural lighting.
 recycled canvas tote via forestbound
I can't stress enough how important natural lighting is to your photos. Colours look their best (and the most true to life), your images will be crisp and clear, and there will be a lovely depth to the shot if you play your cards right. Now, believe me I know that natural lighting can be hard to come by, especially in the colder months, but I highly recommending setting aside an our or two one morning or early evening to either practice or get your shots taken. It doesn't have to be blazing sun, it just needs to be light (in fact sometimes too much sun can make things tricky with shadows and the like). Also, natural lighting doesn't mean you have to take your photos outdoors, but a nice big window that lets in a good amount of light will do the trick nicely.
Things to remember - Avoid direct sunlight and using your flash, as you'll get scary shadows and anything light coloured will become rather bright. If you feel like the light is still a little dark, you can always increase the EV levels found in your camera menu as this will up the 'whiteness' in your photos. If you're unsure, not to worry! Most things can be tweaked and fixed once on the computer! You'll do this by increasing both the brightness and the contrast (or by using the 'curves' tool) in your photo editing program. If you're really having trouble finding natural light, check out the
Strobist's Lighting 101 to get some ideas for lighting indoor and outdoor shots.
2. Work your angles.
 tiny house cube necklace via JDavisStudio
Often online you will have space to show a few different shots of each product, and using angles is a great way to give your photos depth as well as making them dynamic and interesting to look at. Also, by playing around with various shooting angles you're more likely to find the very best perspective for showing off your products. As I mentioned earlier, customers aren't able to handle your products, so showing them from different angles enables them to fully appreciate what you've made. I think it also instills a bit of confidence, as they know that all the seams have been tucked in, no hot glue is showing and the earring posts look firmly in place.
Things to remember: Angles can distort the perceived size of what is being photographed, so make sure there is one or two shots that make it clear how big or small your object is.
3. Crop it good
 georgette skirt via littleocean
Oh, how I love the crop function when editing photos! Knowing that I can do a wide shot in order to get all in want in the frame, and then cut out the edge of my fridge that has snuck into the shot makes taking photos much less frustrating. But cropping isn't only good for cleaning up shots, its also useful to draw the viewer in and pique their interest a little. You don't need to show the whole product in order for someone to click on your listing, but a shot of the hem of a skirt with a great print, or the beautiful pattern on a ceramic bowl could entice someone to want to find out more about the product.
Things to remember: When cropping, you still want to have some balance in your image otherwise it can look a bit squished or overwhelming. A good way to do this is to make sure you leave in a little background, either next to the image or in each diagonal corner. Also if you're cropping from the top and bottom of a shot (and cutting out just the top and bottom of your product), make sure to bring in at least one of the sides also, again to avoid looking squashed. Finally, if you're selling on Etsy, remember that they crop your thumbnails for you so take this into consideration when choosing how much to crop.
4. The close up.
 magical good luck acorn badges via oh my cavalier!
If you're photographing jewellery, or other small items, the macro function is going to be your friend. You can find it by looking for the flower icon on your camera, it usually looks like a little tulip, and it will give your products a nice crisp outline. Close up photography can be tricky, especially if your hands are a little shaky, so you may also want to consider using a tripod to help keep things steady. Keep in mind that close ups aren't only for small items, you could use it to show off a bit of detail on a larger item also. The close up is a perfect opportunity to use your angles, too, and a shot where your product is in sharp focus and the rest fades out a little draws the viewers eye directly to your product.
Things to remember: Like when cropping, you still want to try and keep the shot looking balanced when shooting close ups.
5. Let's get digital.

computer circuit board nightlight via GeekGear
Having some way to digitally edit your images is really important, as it means you can do so much more with your photography! It enables you to crop, sharpen, lighten, resize....the list goes on. Thankfully, there are now some great free programs out there so you're not limited by shelling out for Photoshop. Don't get me wrong, Photoshop is fantastic, but is also rather expensive and can be a little more tricky to use. Here are some of the free programs I would recommend, and please feel free to leave any other suggestions in the comments!
Picnik Picnik is an awesome photo editing website and perfect for those of us with little digital editing experience. It is really self explanatory (most things happen with just a click of a button) and has a ton of fun effects for playing around with on your photos. The one downer is that you can only upload 5 photos at a time, but I have never really had a problem with that. There is an upgrade option (around $2 a month) that will allow you to upload more images, and you`ll also have access to more collage, effects and editing options.
Picasa Picasa is a Google based photo editing program that requires a download. It is a little more hands on than Picnik, but still usable if you don't have any Photoshop knowledge. You can also use Picasa to create a web photo album, if you're not already using Flickr.
Gimp If you already know or are familiar with Photoshop, then I would recommend downloading Gimp. It is really similar, and comes with lots of support. Plus, its free! We all love free!
That's it from me for today, I really hope I have been of some help in your photography endeavours! I will be back with another post all about product styling, where I'll tackle backgrounds, setting up your 'set', choosing props, and more. Happy snapping!


8 comments:
Thanks for the tips. I love that top "Inspire" hoop.
http://oliveobserver.blogsopt.com
Fantastic article! I just met with a professional photographer a couple of weeks ago to get some tips and my photos have improved greatly. I still have a way to go so these tips are very helpful!
Thanks for the detailed and clear explanations. Love the little "tips" too! Looking forward to the next article on product styling.
Reading my mind Poppytalk! I just put that little sampler on my blog this morning. She gives really great tips that are much appreciated!
great post! i love bliss in a teacup's styling, so looking forward to next week :)
thanks for the timely and helpful post! i'm starting up my etsy shop (finally) and was looking for ways to help stylize my photos.
great article :) i enjoyed reading all this and the little pictures in between :)
Great tips Becka! I'm a huge fan of how she styles her photos.
Post a Comment